An introduction to React component props


Props are short for properties and are one of React's most fundamental concepts! Since all React apps use props in one way or another it's essential you have an unshakable understanding of what they are and how to use them.
Due to their unique behavior, props can be confusing and difficult to understand when you're first learning React. Don't worry though! We spent weeks assembling this comprehensive guide full of realistic examples and illustrations (there is even a prop quiz!) to help you on your way.
In this article, you are going to learn:
📍 What props are
📍 Why they are important
📍 How to receive them in a component
📍 The difference between props and HTML attributes
📍 How to destructure props
📍 How to pass props of other data types, such as booleans and numbers
Let's start by taking a closer look at React component and their relation to props.
What is a React component?
Let’s start with an example from a website everyone is familiar with - YouTube. Although it is not built with React, YouTube still uses the concept of components.
In React, a component is an independent and reusable bit of code that makes up the building blocks of any React-built app.
Imagine that you’re tasked to rebuild the YouTube homepage. Having a close look at it, you would easily notice that it is made of repeated elements:
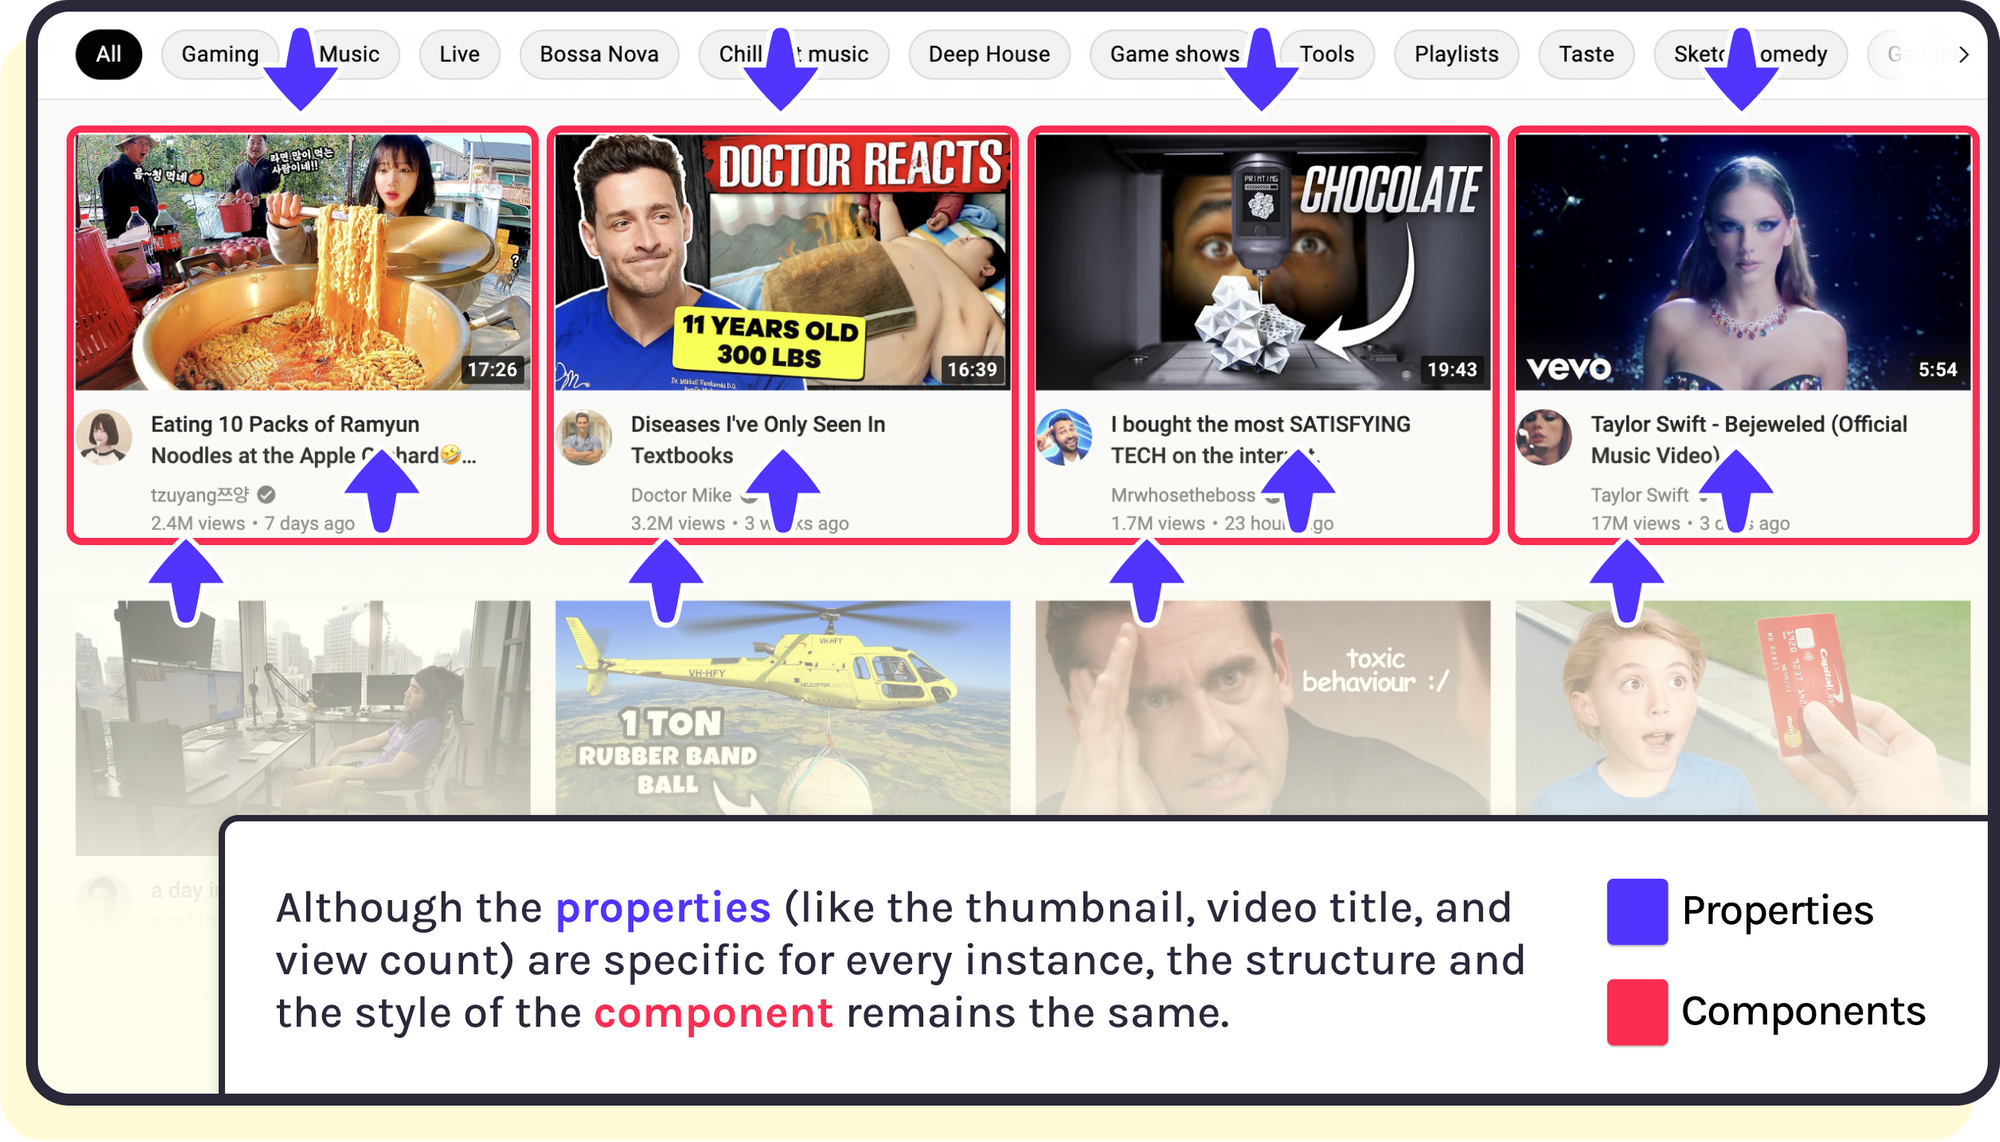
For example, we have a Videotile component. It is made by a thumbnail image, the title of the video, the name of the channel, the view count, and the timestamp:

At first, you might be tempted to code each videotile separately, with its own data - a practice commonly referred to as hard coding.
However, more than 3 million videos are uploaded to YouTube every single day. Surely YouTube developers aren’t spending their time coding up a new Videotile instance every time someone uploads a new video!
Instead, they coded a single Videotile component that can automatically receive the information it needs to display.
At this point, you have figured out that it would be way better to code a single videotile component and, somehow, make it reusable. To make it reusable, the videotile component has to receive data every time a new video is uploaded. Furthermore, the videotile must update itself when, for example, the view count increases and when the timestamp changes.
That’s where props come in. Props allow us to make a component truly reusable, dynamically passing information between components as per our needs.
Writing JSX
To make use of props, it is important to understand how to write JSX code.
JSX is a syntax extension of JavaScript. It allows us to describe how the user interface (i.e., what HTML elements) should look like by seamlessly integrating JavaScript code within HTML tags and vice versa.
Let’s consider a simple component called App that renders an H1 element.
function App() {
  const title = "Mr."
  const lastName = "Whiskerson"
  return (
    <h1>Hello {title} {lastName}!</h1>
  )
}

ReactDOM.render(<App />, document.getElementById("root"))
Inside the component, we declare two variables: title and lastName.
When we’re inside JSX, curly braces give us a chance to “escape” back out of JSX and insert regular JavaScript values and expressions.
If we were to just put <h1>Hello title lastName!</h1>, it would think we wanted the literal text title and lastName to be in the H1 tag. Surrounding those JS values with curly braces ensures the variables get evaluated for their values before inserting them into the text of the header.
Props in action - let’s create a contact component
Okay - I assume that you now understand how props work in principle: it is better to have a flexible component that can receive information instead of a component that contains hard-coded information, making it non-reusable. With props, we can reuse components by passing in dynamic values instead of having to re-create those components with hard-coded data.
Next, let’s make our first component.
First, we will look at the inefficient way to code one (and explain how it is inefficient!), before refactoring it into a component that uses props.
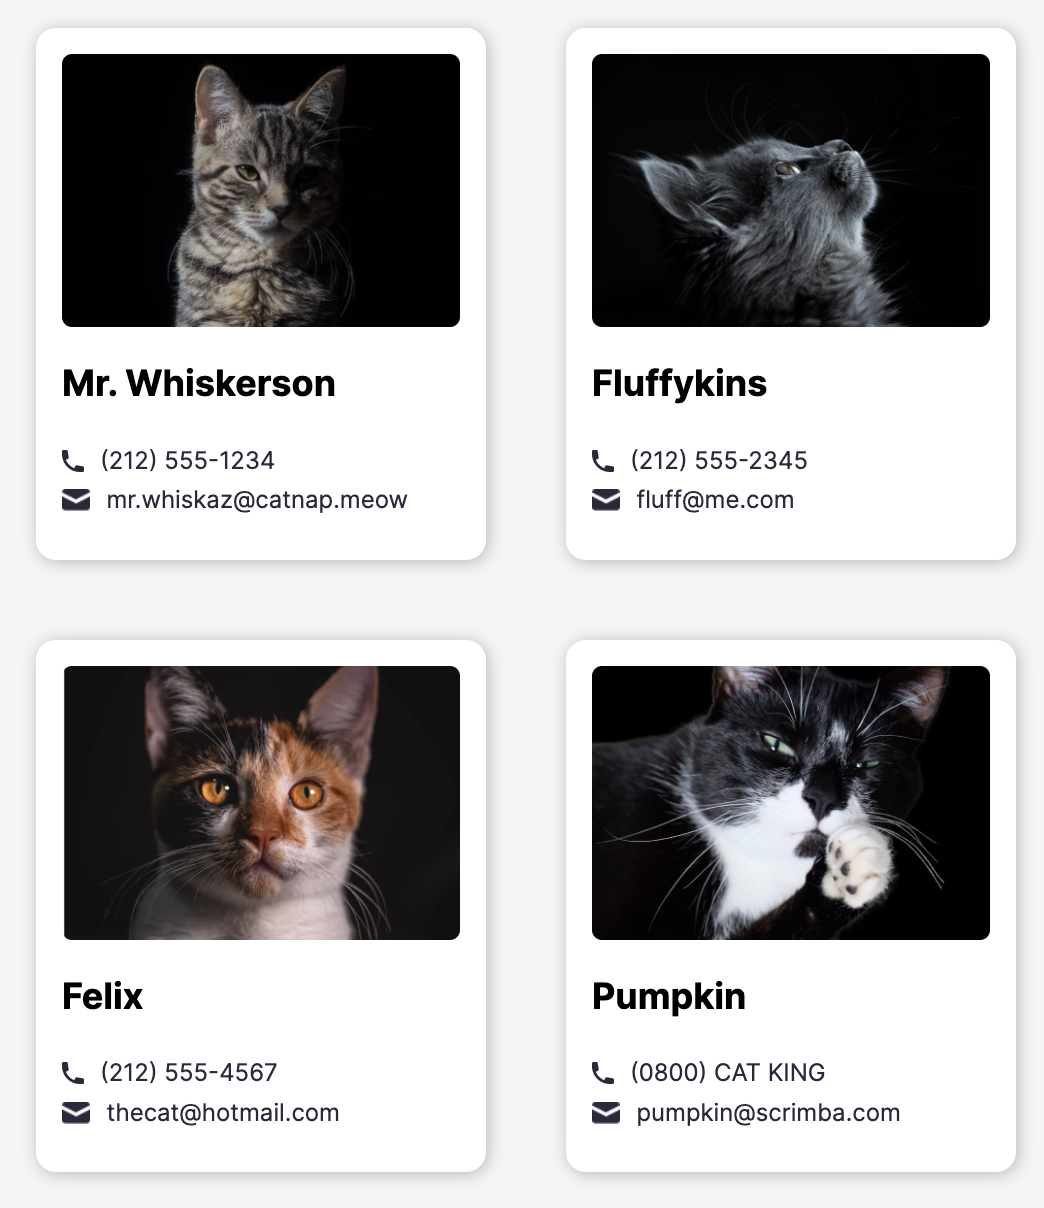
The component we will code is a contact card for cats! I hope you like cats as much as we do (Scrimba's mascot is a cat named Pumpkin 😺!)
// Components in React must always begin with capital letter
export default function App() {
  return (
    <div className="contacts">
      <div className="contact-card">
        <img src="./images/mr-whiskerson.png" />
        <h3>Mr. Whiskerson</h3>
        <div className="info-group">
          <img src="./images/phone-icon.png" />
          <p>(212) 555-1234</p>
        </div>
        <div className="info-group">
          <img src="./images/mail-icon.png" />
          <p>[email protected]</p>
        </div>
      </div>

      <div className="contact-card">
        <img src="./images/fluffykins.png" />
        <h3>Fluffykins</h3>
        <div className="info-group">
          <img src="./images/phone-icon.png" />
          <p>(212) 555-2345</p>
        </div>
        <div className="info-group">
          <img src="./images/mail-icon.png" />
          <p>[email protected]</p>
        </div>
      </div>

      <div className="contact-card">
        <img src="./images/felix.png" />
        <h3>Felix</h3>
        <div className="info-group">
          <img src="./images/phone-icon.png" />
          <p>(212) 555-4567</p>
        </div>
        <div className="info-group">
          <img src="./images/mail-icon.png" />
          <p>[email protected]</p>
        </div>
      </div>

      <div className="contact-card">
        <img src="./images/pumpkin.png" />
        <h3>Pumpkin</h3>
        <div className="info-group">
          <img src="./images/phone-icon.png" />
          <p>(0800) CAT KING</p>
        </div>
        <div className="info-group">
          <img src="./images/mail-icon.png" />
          <p>[email protected]</p>
        </div>
      </div>
    </div>
  );
}
Once we add some CSS (that is why the divs have className), this is what we render:
Why was this an inefficient way to code a component?
In the App component, all the contact data is hard-coded! As we gather new cat contacts in our database, we have two options:
- Keep hardcoding data into our contact cards, losing valuable time 🚫
- Harvest the power of React and make a reusable component with props! ✅
I hope we are on the same page - let’s go for the second option 🙂
First of all, we need to create a custom Contact component. As we can see in the code snippet below, the data is still hardcoded, but we will take care of that very soon.
export default function Contact() {
  return (
    <div>
      <div className="contact-card">
        <img src="./images/mr-whiskerson.png" />
        <h3>Mr. Whiskerson</h3>
        <div className="info-group">
          <img src="./images/phone-icon.png" />
          <p>(212) 555-1234</p>
        </div>
        <div className="info-group">
          <img src="./images/mail-icon.png" />
          <p>[email protected]</p>
        </div>
      </div>

      <div className="contact-card">
        <img src="./images/fluffykins.png" />
        <h3>Fluffykins</h3>
        <div className="info-group">
          <img src="./images/phone-icon.png" />
          <p>(212) 555-2345</p>
        </div>
        <div className="info-group">
          <img src="./images/mail-icon.png" />
          <p>[email protected]</p>
        </div>
      </div>

      <div className="contact-card">
        <img src="./images/felix.png" />
        <h3>Felix</h3>
        <div className="info-group">
          <img src="./images/phone-icon.png" />
          <p>(212) 555-4567</p>
        </div>
        <div className="info-group">
          <img src="./images/mail-icon.png" />
          <p>[email protected]</p>
        </div>
      </div>

      <div className="contact-card">
        <img src="./images/pumpkin.png" />
        <h3>Pumpkin</h3>
        <div className="info-group">
          <img src="./images/phone-icon.png" />
          <p>(0800) CAT KING</p>
        </div>
        <div className="info-group">
          <img src="./images/mail-icon.png" />
          <p>[email protected]</p>
        </div>
      </div>
    </div>
  );
}
Now, we can set our App component to render multiple instances of our custom Contact component.
export default function App() {
  // App returns 4 instances of the Contact component
  return (
    <div className="contacts">
      <Contact
        image="./images/mr-whiskerson.png"
        name="Mr. Whiskerson"
        phone="(212) 555-1234"
        email="[email protected]"
      />
      <Contact
        image="./images/fluffykins.png"
        name="Fluffykins"
        phone="(212) 555-2345"
        email="[email protected]"
      />
      <Contact
        image="./images/felix.png"
        name="Felix"
        phone="(212) 555-4567"
        email="[email protected]"
      />
      <Contact
        image="./images/pumpkin.png"
        name="Pumpkin"
        phone="(0800) CAT KING"
        email="[email protected]"
      />
    </div>
  );
}
Does this syntax look familiar? It should!
HTML elements have attributes. For example, an img (image) tag can take the src (source) attribute. Or an a (anchor) tag can take an href attribute that receives a link.
To give an anchor tag a link, we use the href attribute; to give the component a value, we use props!
We can think of props like custom attributes for our custom React components. In the code snippet above, Contact is our custom component, whereas image, name, phone, and email are props.
Even though the syntax is similar, HTML attributes and props are quite different: for example, where HTML attributes can only take strings as values, props in React can take any kind of JavaScript data type as a value. But more on that later!
Receiving props in a component
Now we are all set up to receive properties in our Contact component. An important note here: props can be used to pass data from a parent component (in this case, App) to a child component (in this case, Contact):

It is not possible to use props the other way around, i.e., to pass data from a child component to a parent component, as the flow of information in React is one way.
There are ways to work around this limitation of one-way data flow in React, but they’re outside the scope of this article. If you want to have a deeper understanding of how this can be achieved, you can start here.
As the component is a function called Contact, we can receive an argument - and that argument is props.
In our case, props is an object that contains 4 key-value pairs: image, name, phone, and email are the keys, whereas the values are specified in the App for each instance of the Contact component.
As we are entering JavaScript, we need some curly braces.
Instead of src="./images/mr-whiskerson.png", we can now write src={props.image}. In this way, we are not hard coding the value (the location of the image), but we are using the value of the props.image object!
In the same way:
name="Mr. Whiskerson”→name={props.name}phone="(212) 555-1234"→phone={props.phone}email="[email protected]"→email={props.email}
We can already see that our Contact component is neater, less verbose, and it does not contain any cat-specific information - basically, we made it reusable, which is what React props are all about!
// receiving props in a component

export default function Contact(props) {
  return (
    <div className="contact-card">
      <img src={props.image} />
      <h3>{props.name}</h3>
      <div className="info-group">
        <img src="./images/phone-icon.png" />
        <p>{props.phone}</p>
      </div>
      <div className="info-group">
        <img src="./images/mail-icon.png" />
        <p>{props.email}</p>
      </div>
    </div>
  );
}
Prop quiz!
Still reading? Congratulations on making it this far! 💯
Take a small break and have a sip of coffee ☕, because it’s time for a little prop (heh heh) quiz!
Would you be able to answer these questions? Take some moments to think about the answer before clicking Show answer:
1. What do props help us accomplish?
Show answer
Simply put, props help us to make a component more reusable.
2. How do you pass a prop into a component?
Show answer
You can pass props into a component using this syntax: <MyAwesomeHeader title="???" >
MyAwesomeHeader will be the name of the custom component, whereas title will be a property of the component.
3. Can I pass a custom prop (e.g. blahblahblah={true}) to a native HTML element (e.g. <div blahblahblah={true}>)? Why or why not?
Show answer
No, because the JSX we use to describe native DOM elements will be turned into real DOM elements by React. And real DOM elements only have the properties/attributes specified in the HTML specification (which doesn't include properties like blahblahblah).
4. How do I receive props in a component?
Show answer
export default function MyAwesomeHeader(props) {
  return <header>{props.title};
}
5. What data type is props when the component receives it?
Show answer
Props are objects.
How did it go? If you didn’t grasp some concepts, it is completely fine! You can go back to the previous sections of this article, or maybe watching the video version of the quiz will help you grok it!
Destructuring props
The feature of destructuring was introduced in ES6, the version of JavaScript introduced in 2015. Given that props are objects, they can be destructured as any other object in JS.
In the React world, you are going to come across object destructuring a lot, so we are going to break it down. Let’s take for example a variable cat with two properties, firstName and lastName.
// declaring an object with two properties

const cat = {
  firstName: "Mr.",
  lastName: "Whiskerson",
};

// destructuring the object with two properties
const { firstName, lastName } = cat;

console.log(lastName); // -> "Whiskerson"
console.log(cat.lastName); // -> "Whiskerson"
After destructuring it, we can write firstName instead of cat.firstName, thus slightly improving the readability. Both of them will still return the same value.
Following on our example of the cat contact card, props is an object with four properties: an image, a name, a phone number, and an email address. We can destructure props in the following way:
//non-destructured props

export default function Contact(props) {
    return (
        <div className="contact-card">
            <img src={props.image}/>
            <h3>{props.name}</h3>
            <div className="info-group">
                <img src="./images/phone-icon.png" />
                <p>{props.phone}</p>
            </div>
            <div className="info-group">
                <img src="./images/mail-icon.png" />
                <p>{props.email}</p>
            </div>
        </div>
    )
}

// destructured props

export default function Contact({ image, name, phone, email }) {
  return (
    <div className="contact-card">
      <img src={image} />
      <h3>{name}</h3>
      <div className="info-group">
        <img src="./images/phone-icon.png" />
        <p>{phone}</p>
      </div>
      <div className="info-group">
        <img src="./images/mail-icon.png" />
        <p>{email}</p>
      </div>
    </div>
  );
}
Note that instead of props.image, now that we destructured props, we must write image only.
Using prop destructuring is ultimately a personal choice. In a scenario where the object has many properties, it may be reasonable to avoid destructuring at the cost of repeating the props keyword every time that a prop is used.
On the other hand, when we do not have a lot of props as in our cat contact card, using destructuring could be helpful to highlight the props that are used in the component by improving the readability of the code.
Passing in non-string props
The concept of props is very similar to the concept of HTML attributes, and with HTML attributes we always pass a string as the value (i.e., src="./image.png"). It is tempting to think that you could only pass string values for props…but nope, we are in JavaScript world and we can pass everything we want - a boolean, a number, or even an object or a function.
Passing in a non-string prop is pretty straightforward and uses a trick that we have already seen in this article: the use of curly braces.
Imagine that we want to include in our Contact component an isAvailable prop that we could later use to show or hide the contact card according to the cat’s availability to meet 🤣. In addition, we want to know how old the cat is, which we can indicate using a number.
// passing non-string props

export default function App() {
  return (
    <div className="contacts">
      <Contact
        img="./images/mr-whiskerson.png" // string
        name="Mr. Whiskerson"
        phone="(212) 555-1234"
        email="[email protected]"
        isAvailable={true} // boolean
        age={7} // number
      />
    </div>
  );
}
By surrounding the boolean value or the number with curly braces, JSX interprets it as, respectively, a boolean and a number.
As a teaser, it is also possible to pass functions as props. This feature is incredibly useful because, by passing a callback function as props, we can pass data from child to parent components!
The verdict
The concept of props is at the core of React, and every React developer should have a proper (pun intended!) understanding.
In this article, we have learned what props are, how they are used to code reusable components, how to pass data between components, and some useful tricks such as destructuring and passing non-string props.
By now, I hope you feel confident enough to use props in your day-to-day React practice!
If you want to practice more with props, I suggest checking out the Learn React Course at Scrimba. It is free, taught by a great instructor, and has plenty of challenges and projects that will help you to learn React in an interactive way.
![Frontend Interview Prep Guide [2026]](/articles/content/images/size/w600/2026/07/112-hero-1.jpg)
![How to Test React Apps [2026]](/articles/content/images/size/w600/2026/07/111-hero-1.jpg)
![React Router: A Complete Guide [2026]](/articles/content/images/size/w600/2026/07/110-hero-1.jpg)
![Best Full-Stack Developer Courses [2026]](/articles/content/images/size/w600/2026/07/109-hero-1.jpg)